Create a Tool
Tools, Tool Modes and Tool Actions
Before we begin creating the new drawing tool let's discuss some of the terms used in a tool.
Tool
When we create a tool with the OBR.tool.create function we're creating a new tool in the toolbar.
The toolbar is located on the right side of the screen and is only shown when a scene is open and ready.

Tool Mode
A tool mode can be created with the OBR.tool.createMode function. Tool modes are show on the left side of the top menu.

When clicked a tool mode will become active. An active mode will receive pointer events for clicks and drags.
Tool Action
A tool action can be created with the OBR.tool.createAction function. Tool actions are show on the right side of the top menu.

In comparison to a tool mode an action does not have an active state. Instead when you click a tool action an event should occur. For example you could open a color picker or fill the scene with fog.
Create a Tool
Create a new line.svg file in the public folder of your project:
<svg xmlns="http://www.w3.org/2000/svg" width="24" height="24">
  <line x1="6" y1="18" x2="18" y2="6" stroke="#000" stroke-width="4" stroke-linecap="round"></line>
</svg>
In the main.js file create the tool:
import OBR from "@owlbear-rodeo/sdk";

const ID = "com.tutorial.custom-tool";

function createTool() {
  OBR.tool.create({
    id: `${ID}/tool`,
    icons: [
      {
        icon: "/line.svg",
        label: "Custom Tool",
      },
    ],
    defaultMetadata: {
      strokeColor: "red",
    },
  });
}

OBR.onReady(() => {
  createTool();
});
First we create an ID com.tutorial.custom-tool to uniquely identify our extension. The convention used here is called reverse domain name notation. This helps us prevent namespace collisions with other extensions. When making your own extension you should change this ID to match the domain name of your site. To learn more see here.
Next we create a tool using this ID and our line.svg icon.
Here we also make sure to set the default metadata.
Each tool has it's own metadata that will be persisted in local storage. This allows us to communicate between the tool actions and modes. For example we can have a color picker action that updates the strokeColor for the current tool. Then in our line drawing mode we can read that metadata and use the chosen color.
Lastly we listen to the onReady event before we create our tool.
Now when we open our room we'll see our custom tool:
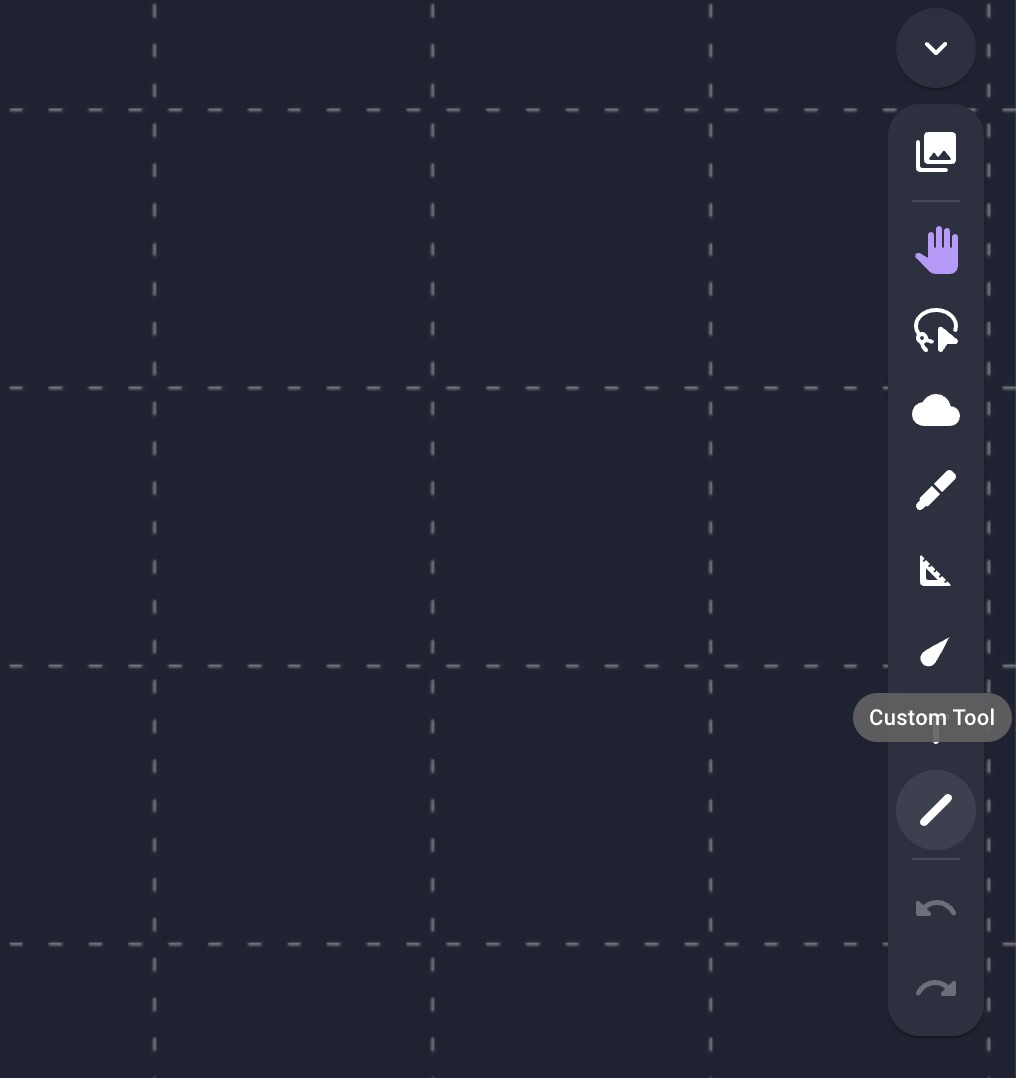
Create a Tool Mode
If we select our new tool you'll notice that it acts just like the built-in movement tool. To respond to drag and move events let's create a custom tool mode.
function createMode() {
  OBR.tool.createMode({
    id: `${ID}/mode`,
    icons: [
      {
        icon: "/line.svg",
        label: "Line",
        filter: {
          activeTools: [`${ID}/tool`],
        },
      },
    ],
  });
}
First we create a mode with a custom ID.
Next we set up our modes icons. We only need a single icon so we have a single element in our icons list. Next we have a filter that says our icon will only appear if our custom tool is active.
If we were to remove this filter then our custom mode would be available to all tools.
To learn more about how filters work in Owlbear Rodeo see our reference here.
Next let's make sure we call our createMode function in the onReady callback:
OBR.onReady(() => {
  createTool();
  createMode();
});
If we go back to Owlbear Rodeo now we'll notice that we haven't actually changed anything. This is because we only have a single mode available for our custom tool. When this is the case Owlbear Rodeo will hide this mode from the top bar. This allows the UI to be cleaner. In order to see our new mode let's continue and create our color picker action.
Create a Tool Action
Add a createAction function to the main.js file:
function createAction() {
  OBR.tool.createAction({
    id: `${ID}/action`,
    icons: [
      {
        icon: "/icon.svg",
        label: "Color",
        filter: {
          activeTools: [`${ID}/tool`],
        },
      },
    ],
  });
}
This function will create a new action with the circle icon.svg icon. Like our custom mode it will also only be available when our custom tool is active.
Make sure we call our createAction function in the onReady callback:
OBR.onReady(() => {
  createTool();
  createMode();
  createAction();
});
Now when we head back to Owlbear Rodeo and select our tool we'll see two top menu items.

In the next part we'll implement our custom line drawing mode.